
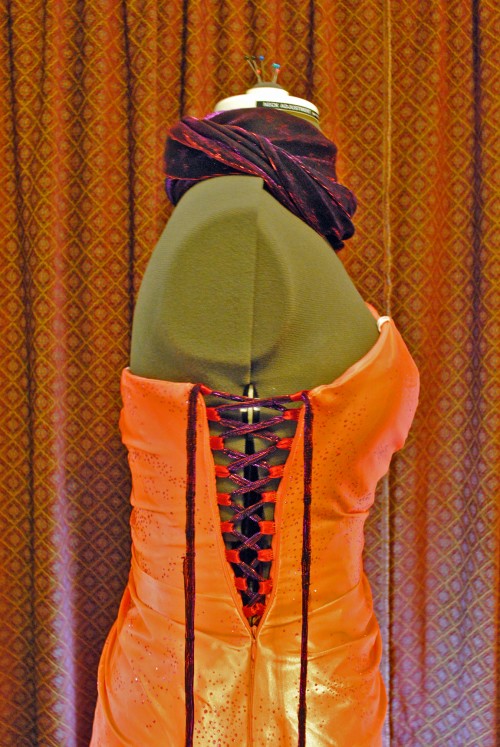

This ribbon lacing tutorial is a very basic quick fix for a dress that you can zip to your waist area but not over your ribcage/bust–you know, one of those thrifted dresses that *almost* fits like a glove, but not quite. Thus far I’ve only used this technique for costume dresses worn for an evening or two. If you want something stronger and more durable I would recommend researching grommets and information on corset-making to get a better idea of how lacing is usually done before you go with this tutorial. You can play around using different ribbons and fabrics to incorporate whatever you have on hand for this project. Some ideas for lacing include non-fraying fabric strips, actual laces, or contrasting/matching ribbon. For this project I used ½” red satin ribbon for the loops and purple star printed fabric for the lacing.
Step 1: Mark on the inside of your dress the highest point it will zip while trying it on. Then decide, based on how much space you need to lace up and how wide your ribbon is, how many loops you will need; mark the regular intervals for sewing the loops on the inside of the dress. I marked mine approximately an inch apart all the way up each side and used ½” wide ribbon.
Step 2: Determine the length of your ribbon loops depending on how far inside the dress you are attaching them. I recommend sewing the loops as close to the zipper as possible to keep the dress flat when laced tightly; if you sew the loops too far away from the original zipper placement it can cause puckering. Once you have a test piece of ribbon cut to the right length, cut the remaining pieces you will need, using your original piece as a guide. The total number of ribbon pieces should match the total number of marks you made on the inside of the dress. When all the ribbon is cut you can singe the edges slightly with a lighter to keep them from fraying, if needed.
Step 3: Take each piece of ribbon, pinch in an even loop and pin to the marks on the inside of the dress. Sew your loops securely to the inside layer of the dress; I did this by hand since my dress was multi-layered. If your dress is only one layer you can use a matching color of thread (unless you want the stitches to show on the outside of the dress) and simply run it through your sewing machine which saves tons of time, lucky you! Seriously though y’all, I am SO SLOW when sewing by hand, and SO SPOILED by my sewing machine.
Step 4: Once all of your loops are securely attached you can try on your dress and figure out how long your piece of lacing material needs to be. My material had a little stretch so I was able to cut a sufficient piece from one edge of a random fabric scrap I had lying around. If your fabric scrap/other lacing material is too short simply cut multiple pieces and quickly sew them together using your machine and matching thread to create the length needed to securely lace your dress.
Step 5: Time to lace it up! Attach safety pins to each end of your lacing material and use the safety pins to guide the material through the ribbon loops. Once you’re ready to tighten and tie it off, remove the safety pins. I tied mine in a simple bow and left the long ends hanging because I liked the effect, but if you end up with too much excess after lacing, simply tuck the ends into the dress.