
 We’re a bit behind with the blog this week, so sorry about that, but it’s for a good reason! Let me explain. We were busy hot tubbing it up at a cabin retreat last weekend. Haha! We spent most of our time eating delicious food, lounging in the hot tub, and of course drinking beer and socializing around the fire pit–the fire pit that we dug and then filled back in ourselves because there wasn’t one and seriously, what is a cabin retreat without a fire pit?! We also made sure to get a bit of exercise and a nature fix, hiking a trail full-o-waterfalls in Bryson City, NC. It’s really beautiful out there and it was nice to break up the regular routine for a weekend and celebrate the arrival of warm weather with family and friends.

Two of our friends who joined us for the excursion had birthdays coming up, so I made a cheesecake to celebrate. As you will soon discover, I never turn down the chance to make a cheesecake. Those of you who know me personally know that ‘round these parts I’m sometimes referred to as The Cheesecake Queen (or master, or princess, but always prefaced with “cheesecake”), as homemade cheesecakes and custom cheesecake recipes are my forte. There have even been half-serious jokes about a cheesecake tattoo happening someday. Don’t worry, I’ll post pics. 😉

Funny thing is, I don’t particularly care much for eating cheesecake myself these days, probably because I’ve created and baked so many of them that they’ve started to seem run of the mill to me. However, when I was younger and rarely presented with a real-life, painstakingly baked and beautifully presented cheesecake, it was by far my favorite dessert. Silky, rich, indulgent, endless flavor combinations, and just the right amount of sweet contrasted by the creamy, slightly tangy cream cheese flavor. I seriously thought I might die of happiness the first time I was treated to a slice at The Cheesecake Factory.

My initial foray into the world of cheesecake-making was a no-bake Jello brand box mix in my high school days. Don’t ask me how they make powdered cream cheese mix because I have no idea, but they do! It was alright, but I knew then and there that the no-bake box mix wasn’t for me. I didn’t have the know-how or the tools back then, but over the years I’ve used the resources available for free on the vast interwebs to practice and learn, and I’ve honed my technique to the point where I can usually make up a cheesecake recipe based on my preferred flavor profile and have it turn out well on the first try. The recipe is generally perfected by the second attempt.

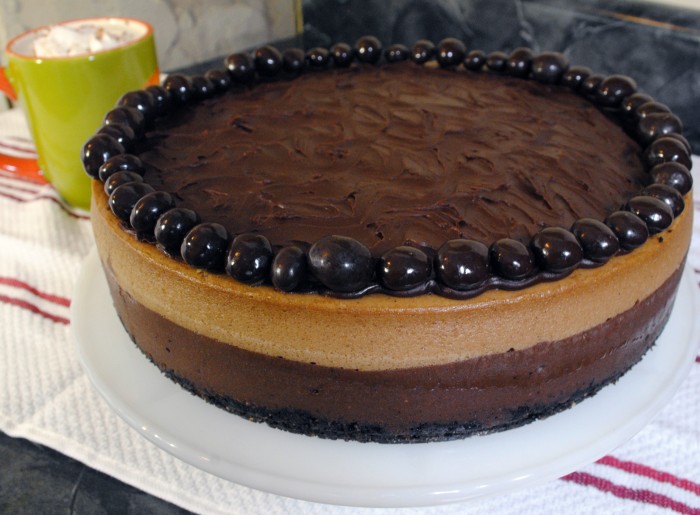
That is not to say I don’t sometimes make mistakes. As a matter of fact, my water bath ran dry on the Layered Mocha Cheesecake I’m presenting you with today, so it sunk a bit in the middle and the edges got a little hard before the center was done. Let that be a lesson to you all; if you want a pretty final result, don’t skip the water bath and be sure to keep an eye on it as it bakes so that there is always ½”-1” of water in the bottom of the pan. A bit of careful trimming and a healthy dose of ganache poured on top did the trick this time for presentation purposes. The flavor and texture were mostly unaffected so it was still tasty, thankfully.


The Layered Mocha Cheesecake is one of my most requested cheesecake recipes. It’s perfect for both chocolate and coffee lovers, and indulgent and rich without being overly sweet. We start with a chocolate crumb crust spiked with a hint of cinnamon, then add a dense layer of dark chocolate cheesecake, followed by a layer of light coffee-flavored cheesecake, and finish it off with a silky layer of dark chocolate ganache and a ring of chocolate covered espresso beans.


Each layer has its own distinct texture and flavor, which is my favorite thing about layering cheesecake batters. It’s basically like two cheesecakes in one! For those of you who are gluten-free either out of necessity or preference, I have included an alternate gluten-free crust recipe at the bottom. I’ve made it both ways and no one could tell a difference.


It’s been so long since I created this recipe that I’m not sure of the original inspiration, but I did some googling and came up with this which was likely where I got the idea. I don’t like the proportions in the original nor some of the ingredients (flour in the batter–never!), which I’m sure is why I came up with my own version. I am very picky about ingredients and ratios in my cheesecakes as my standard base mix never fails me, so I don’t generally use other recipes without significant alteration. I can sometimes be stubborn in my ways.


If you’re looking for a way to impress with your mad baking skillz, cheesecake is it. A perfect cheesecake isn’t all that difficult, as long as you pay attention to technique and make sure you have a proper springform pan. In the future I plan to post a general cheesecake method/tip page, but for now just follow the mixing and baking instructions precisely and your end result will garner praises from all the cheesecake lovers in the room. Best of luck, and please comment with any questions or feedback if you give it a go.

*Update: 1/18/2016–I promised better final shots of this cheesecake in my initial post because, due to the water bath running dry, we had to use final images that were several years old. Made this cheesecake again recently for a friend’s birthday, came out perfectly this time, so final shots have been switched out accordingly. See cheesecake photo album on Facebook for contrasting shots of old cheesecake and recent cheesecake, HUGE difference, made several years apart, and shows how much you can improve over time with practice and research. I believe it’s a testament to both my cheesecake-making skills, and also MC’s photography skills.

Layered Mocha Cheesecake Recipe
(makes one 9” cheesecake)
Ingredients:
Crust (see alternate gluten-free version below recipe)
- 1 ½ c chocolate graham cracker crumbs
- 2 tbsp sugar
- ¼ c melted butter
- ¼ tsp cinnamon
Chocolate Filling
- 5 oz semi sweet chocolate chips or chopped baking chocolate
- 2 8oz packs cream cheese, room temp
- ¾ c sugar
- ⅛ c cocoa powder
- 2 eggs, room temp
Coffee Filling
- 2 tbsp + 1 ½ tsp instant coffee granules
- ¼ tsp cinnamon
- 1 tbsp boiling water
- 2 8oz packs cream cheese, room temp
- ¾ c sugar
- ½ c heavy cream
- 1 tsp vanilla paste (can sub vanilla extract)
- 2 eggs, room temp
Ganache Topping
- 1 c heavy cream
- 8 oz semi or bittersweet chocolate
- chocolate covered espresso beans (optional)
Special Tools:
- 9” springform pan
- larger pan with 2” or higher sides which will be big enough to hold your springform pan (I use an ancient roasting pan which fits up to a 10” springform pan inside)
- cake spatula (not necessary, but highly recommended for moving your cheesecake from pan to serving platter)
Method:
Preheat oven to 350°.
Grease and flour a 9” springform pan, then wrap the bottom and sides securely with several layers of tin foil so that it is leak-proof.
Crust
Combine all crust ingredients in a small mixing bowl until thoroughly mixed and evenly moistened, then press onto bottom and partially up sides of prepared springform pan with your hands or the bottom of a glass. Bake in preheated oven for 10 mins, then remove and set aside. Lower oven temp to 325°.
While crust is baking, melt 5 oz chocolate chips or chopped chocolate slowly in double boiler over med-low heat, then remove from heat and set aside, allowing to cool while you continue mixing. I don’t own a double boiler, so I use a small shallow frying pan on top of a small pot with about ½” of water in the bottom (see picture above of my makeshift double boiler melting that chocolate like a boss).
Chocolate Batter
Using an electric mixer on med-high, beat 2 packs cream cheese, ¾ c sugar and ⅛ c cocoa powder until light and fluffy. Turn speed to medium and add the 2 eggs one at a time, scraping down bowl as necessary. Do not over mix as this can cause air bubbles; you want everything mixed just until combined at this stage. Fold in cooled melted chocolate gently by hand with rubber spatula, then pour into prebaked crust and smooth with spatula.
Coffee Batter
In a small bowl, combine instant coffee granules, cinnamon and boiling water and mix until coffee granules are dissolved, then set aside to cool. Using an electric mixer on med-high, beat 2 packs cream cheese and ¾ c sugar until light and fluffy. Turn speed to medium and mix in cream and vanilla paste, scraping down sides of bowl as needed. Add 2 eggs, one at a time, mixing after each addition just until combined. Turn speed to med-low to mix in the coffee mixture until there are no streaks left. It is even more important not to overmix your top layer of cheesecake batter to help prevent cracks, so mix everything gently with the exception of creaming the cream cheese and sugar at the beginning. Pour coffee batter over top of chocolate layer; the coffee batter is much thinner so you shouldn’t need to smooth over this layer as it will settle itself.
To Bake
Place prepared cheesecake into the larger pan, then add enough hot water to come about 1” up sides of springform pan. Bake at 325° for 1-1 ½ hours until edges of cheesecake are set, top is lightly browned and center is mostly set but still jiggly. Turn off heat, leave oven closed and let cheesecake rest in oven until it’s completely cooled. The center will solidify as it sits in the cooling oven and it will turn out perfectly cooked and even on top with no cracks and no sinking when done. Once cheesecake has cooled to room temp and center has set, remove springform pan from water bath and refrigerate the cheesecake in the pan. It’s best to let it chill for at least 8 hours before removing from pan.
Ganache
When you are ready to remove your cheesecake from the springform pan to your serving platter, go ahead and prepare the ganache topping. In a small pot over med-high heat, heat the cream until it boils. Cream will boil over in the blink of an eye and make a huge mess on your stovetop (trust me, NOT fun to clean), so watch it closely and turn off the heat the second you see bubbles forming in the cream. If it starts to boil over, lift the pot from the burner for a moment to let it settle. Quickly add the chocolate chips or chopped chocolate, making sure chocolate is completely submerged in the cream. Let it sit on the hot burner for about 5 minutes to allow the chocolate to melt. After 5 minutes, quickly stir or whisk the mixture until completely combined and smooth, then remove from burner and let cool to desired consistency.
While your ganache is cooling, remove the foil and the sides of the springform pan, then carefully remove the cheesecake from the bottom of the pan using either a round cake spatula or a couple of regular spatulas and place on your serving platter. Pour cooled ganache over top of cheesecake and decorate the edges with chocolate covered espresso beans if desired. If your ganache is still a bit warm you’ll get a nice flat glossy surface, but if it’s a little cooler and thicker you can spread it out with a rubber spatula and create a ripple or swirl effect. Refrigerate for at least 30 more minutes to allow the ganache to set, then slice and serve when ready.
Alternate Gluten-Free 9” Chocolate Cheesecake Crust Ingredients
- 1 ½ c gluten-free chocolate cream-filled cookie crumbs (like Oreos)
- ⅛ c almond flour
- 3 tbsp melted butter
- ¼ tsp cinnamon
Follow instructions for assembling crust in recipe above.